Do you want to take a screenshot on your laptop? If yes, then this article is especially for you because, in this article, I will show How to take a screenshot on a Dell laptop.
The first question is, are you looking for the best screenshot software for your Dell laptops?
All Windows laptop comes with inbuilt software, so why do you purchase screenshot-taking software?
The most popular free screenshot-taking software is the snipping tool.
The snipping tool is available for almost all Windows PCs, and it’s 100% free software. It is Inbuild software If your laptop doesn’t have this software, then go to your browser and then search for the snipping tool and download their alternatives for your laptop.
If you have Windows 11 or 10 laptops and you want to take a screenshot quickly, some tips for you are listed below to take a screenshot on a Dell laptop.
The snipping tool is one of the best free tools to take screenshots, but it’s officially not available on Mac here is the snipping tool for Mac.
How to take a screenshot on a Dell laptop – 4 Methods:
1. Use Snip & Sketch App
The first method I have for you is to take a screenshot using the Snip & Sketch app, this app comes with almost all Windows 11 and Windows 10 versions. If you don’t have a Snip and Sketch app, then you can download this from the Microsoft store.
Here is how to take screenshots using Snip & Sketch App:
Open Snip and Sketch app
Click on the new button
Select the area using your mouse
That’s it now your screenshot is in your clipboard.
You can also set up prt sc button to take screenshots.
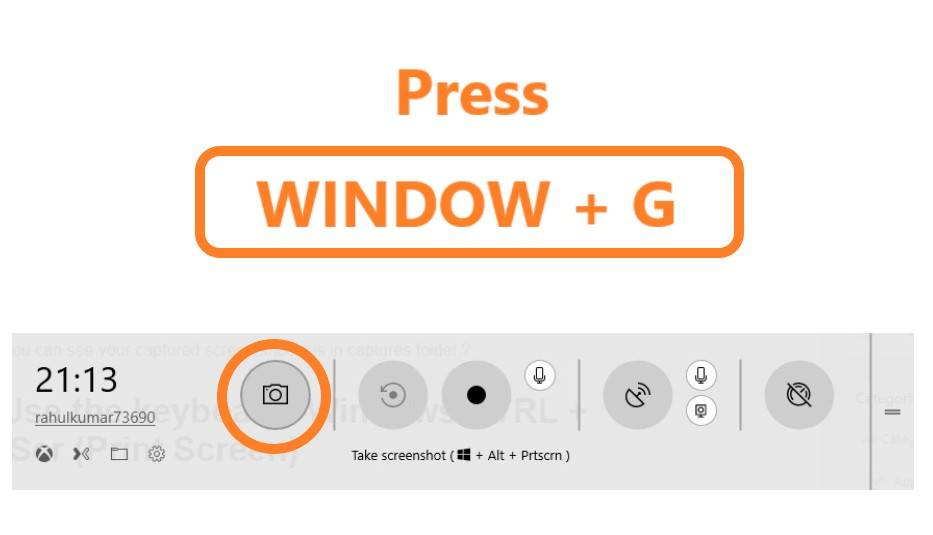
2. Use your keyboard: Window Button + G
The second method I have for you is to take screenshots using the keyboard, and it works in almost all versions of Windows 11 and Windows 10.
On your keyboard, press the Window Button +G to open the game bar.
When you press the Windows + G button, a popup window will open, which is named Gamebar. With this app, you can easily take full-screen shots, and you can also record your screen using the game bar.
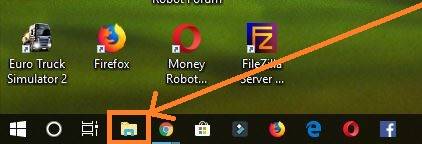
How to find captured screenshots using Gambar (Windows + G)
Open your file explorer.
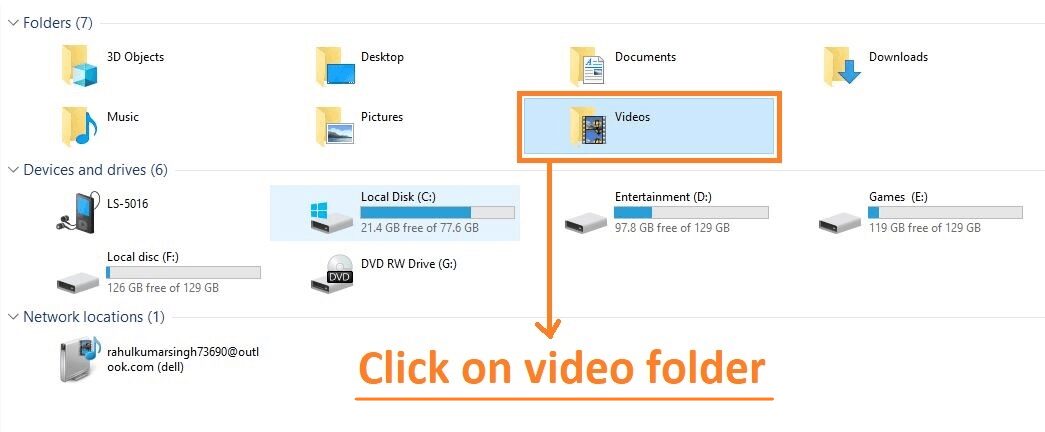
Click on the video folder.
Now open the captures folder.
Then, you can easily find your captured screenshots in the captures folder.
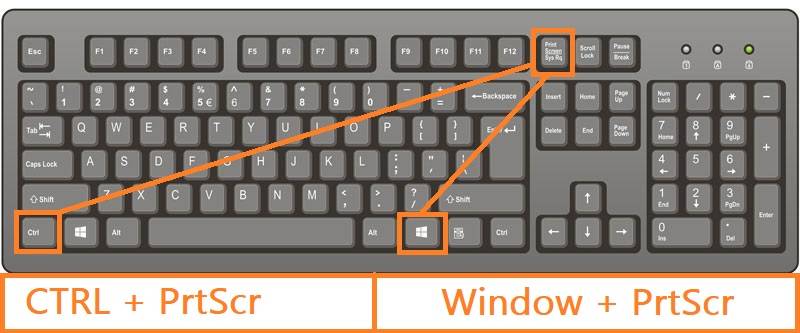
3. Use your keyboard: Windows/CTRL + PrtScr
The third method I have for you is to take screenshots using the keyboard, and it also works in all versions of Windows (Windows 11, Windows 10, Windows 8, Windows 7, Windows XP): on your keyboard, press the Window / CTRL Button + PrtScr (Print Screen).
When you press the (Window / CTRL Button + PrtScr) buttons on your keyboard, then take your full-screen shots will automatically. If this method does not work on your laptop,p then Press Ctrl + Fn + Prtscr.
How to find captured screenshots using Window / CTRL + PrtScr (Print Screen)
Open your file explorer.
Go to the pictures folder.
Now you can see the screenshots folder.
Then, you can see your captured screenshots using (Windows/CTRL + PrtScr) in the screenshots folder.
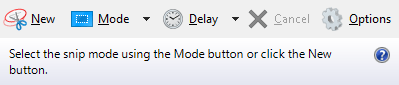
4. Use Screenshot App: Snipping tool
The fourth method I have for you is to take screenshots using the default Windows application called snipping tool, and it works in all versions of Windows (Windows 11, Windows 10, Windows 8, Windows 7, Windows XP): on your application, press the new button to take screenshots,
You can take screenshots easily with the snipping tool:
Free-form Snip.
Rectangular Snip.
Window Snip.
Full-screen Snip.
If you want to record a screen without downloading any app, then use this screen recorder.
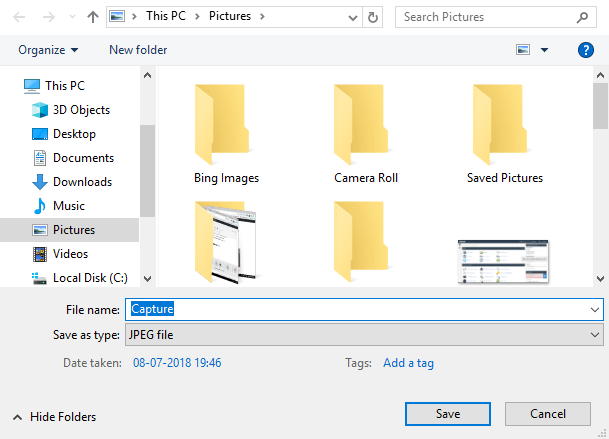
How to save captured screenshots using the snipping tool
Here is How to save captured screenshots using the snipping tool:
Click on the Save button.
Choose the destination to save the file.
Then, you can see your captured screenshots using (the snipping tool) in your destination folder.
Conclusion:
If you follow any steps given in this article,e then you can easily take screenshots on your Dell laptop without any issue.
At last, I need your help to understand how this article is. If you have any questions about this, then write your query in the comment box.
We sometimes use affiliate links in our content. This won’t cost you anything but it helps us to offset the costs of paying our writing team. Thanks for your support!